Sunday, October 5, 2014

Review on Sigma Brushes & My Favs!

A Couple of months I received an amazing brush kit from Sigma called the Extravaganza Copper Complete Kit. This kit comes with 29 brushes including face, eye and lip brushes.  I was familiar with a few Sigma brushes such as the E40, E25 and F80 but I hadn't really tried out any of the others.

It didn't take much for these brushes to win me over. I absolutely fell in love with Sigma brushes. They are amazing quality for a reasonable price. Sigma carries a lot of brushes that are dupes for MAC brushes but at a cheaper price. I love MAC brushes and i'm not going to say that I don't love them anymore but they can ring up your bill by a couple hundreds with just a few of their brushes. Luckily for me I have a pro discount but in the future when I have to replace some of my brushes I will definitely get them from Sigma.

For those of you who don't know too much about Sigma and what brushes you should purchase, I'll give you my recommendations. The pricing for the brushes are for silver handle brushes only. All copper and gold handle brushes are a few dollars more.

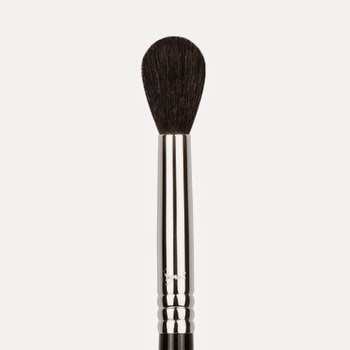
1. Sigma E40- Everyone needs a blending brush as a staple in their brush collection. This one is great for blending out transition eyeshadows. Since it is a fluffy brush, the eyeshadow distributes evenly on the eyes.

Price $16.00 USD

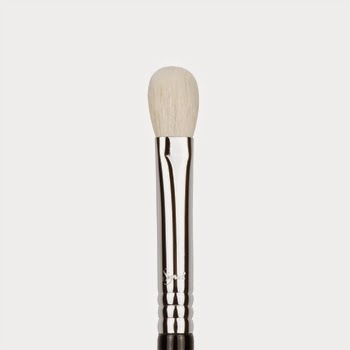
2. Sigma E25- This is also a blending brush and the exact dupe for MAC's 217. I like to use this brush to apply darker eyeshadows into my crease. If you have small eyes you can just purchase this one and skip the E40 brush.

Price $14.00 USD

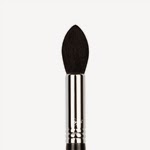
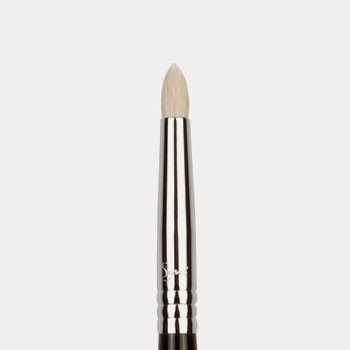
3. Sigma E30- The pencil brush. This is another dupe for MAC's 219 brush. I use this for applying dark eyeshadows to the outer v of my eye. The brush has a small pointed tip so it makes it easy to have control of where you want to apply the eyeshadow. You can also use this brush to smudge out the lower lash line.

Price: $14.00 USD

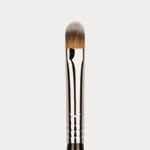
4. Sigma F70- Need a good concealer brush? How about a brow highlight brush? How about 2 in one? Look no more. First and foremost this is a concealer brush and I use it mainly to apply my eyeshadow base but it also works great as a brow highlighter. Anytime I use eyeshadows right under my brow, this right here is my go to brush.

Price $14.00 USD

5. Sigma E06- One of the things i always struggle with is a winged liner. I've been doing makeup for years and still to this day I always have issues getting that perfect wing. I'm sure a lot of you can relate. The Sigma E06 is my baby when it comes to winged liner. The way the brush is designed makes it so easy to accomplish the task. I like the fact that it's a very thin small angled brush. Try it out for yourself and you'll thank me later.

Price $14.00 USD

6. Sigma 3DHD- My holy grail foundation brush!!! Exciting news...this brush will launch on Sigma's website on October 6, 2014. Let me just say that applying foundation has never been so easy. This brush was designed to make the application of foundation easier without you having to make any facial movements. All the angles in the brush makes it easy to get into all the crevices of the face. It doesn't leave any streaks and gives you an airbrushed finish. This is a highly recommended face brush.

Price Not Released. Available on Sigma's website October 6th.

7. Sigma F35- My go to brush for highlighting the face. You can use this brush to set your under eye concealer or to add that glow to the highlights of your face.

Price $24.00 USD

Although I do have more Sigma brushes that I love, these are the ones you can start with. There are obviously other essentials such as a contour brush, powder brush, blush brush, etc. but for now I leave you with the ones listed above. I will eventually create an updated blog post with my favorite brushes from a variety of brands.

 To purchase any Sigma products, click the link below.

 http://www.sigmabeauty.com/?Click=660894


My Favorite Face Highlighters

Hello Everyone! So sorry I've been away for such a long time. I will be updating my blog more often. I have many products that I want to review and share my thoughts on.

Today I want to share my favorite highlighting powders. Am I the only one obsessed with highlighters? I'm so big on dewy skin & highlighted cheek bones so keep reading to find out what highlighters I'm obsessed with.

Before I begin let me just share with you that my skin tone is fair. Regardless, I'm sharing with you highlighters that will work on different skin tones.

1. MAC Mineralize Skin Finish in Lightscapade (Fair to Medium Skin Tones)

This is an oldie but a goodie. I am a fan of most MAC Skin Finishes and this one is a favorite for me. In the compact it appears white with gold and light blue reflects in it but on the skin it is appears as a soft pearl. I usually wear this highlighter over MAC's Hush or Pearl cream color base to give it some  intensity. What i like about this highlighter is that it doesn't have obnoxios glitter in it so it also looks good on mature skin.

Price $32.00
http://www.maccosmetics.com/product/shaded/159/30735/Products/Face/Powder/Mineralize-Skinfinish/index.tmpl


2. Too Faced Candlelight Glow (Fair to Medium Skin Tones)

I haven't owned this product for a long time but I have been loving it. This is a duo highlighter so you'll notice that the left half is a sheer gold and the right half is a rose colored powder. The pale gold is meant to warm up the skin while the rose is meant to illuminate the skin. I normal just swirl my brush to get both colors and then apply it to my cheek bones. Since i'm fair, this highlighter appears as a pale gold on me but if you're in the medium skin tones or if you have a nice tan, this will look amazing on you.

Price $30.00 USD
https://www.toofaced.com/p/face-powders/candlelight-glow-duo/

3. NARS Albatross (All Skin Tones)

This is a highlighter that I believe is universal yet it will look different on everyone. At first this highlighter can seem a bit intimidating since it looks white in the compact but when you swatch it, you can see the gold undertone. This highlighter is a yellow gold so it may come off very yellow on some people depending on their skin tone. It is also very pigmented so be light handed with the brush. Even though I love this highlighter I personally think it looks best on
medium to dark skin tones.

Price $30.00 USD
http://www.sephora.com/blush-P2855?keyword=nars%20albatross&skuId=957324&_requestid=147273

4. Hourglass Ambient Lighting Powder in Ethereal Light (Fair to Light Skin Tones)


This highlighter is new to me. I heard about it through some of my favorite beauty gurus and I had to try it for myself. This is a very soft muted highlighter and again, it's great for those who don't like over the top highlighters. This powder will make you look like you're glowing from within as Jaclyn Hill would say. This is something I would also recommend on mature skin. This shade appears as a cool white powder in the compact and on the skin as well. This one is on the pricey side so if you want to save some money I would recommend MAC Mineralize Skin Finish in Lightscapade as a substitute for this one.

Price $45.00
http://www.sephora.com/ambient-lighting-powder-P377723?skuId=1483510

5. BECCA Shimmering Skin Perfector Pressed in Opal (Light to Medium Skin Tones)

Out of all the highlighters, this one is my current obsession right now! I can't say enough about it. This highlighter is a golden opal pearl as described on the Becca website. It is one of the most pigmented highlighters I own so I have to use very little when I apply it. I use this almost on the daily and it just gives my face the most beautiful glow.

Price $38.00 USD
http://www.beccacosmetics.com/us/store/perfectors/perfectors/shimmering-skin-perfector-pressed/

6. BECCA Shimmering Skin Perfector Pressed in Moonstone (Fair to Light Skin Tones)


Since I am a fan of these Becca highlighters I decided to throw in another one. I use Moonstone when  I want a very white highlight. This one is a pale gold but it looks more like a pearl color on my skin tone. I personally think this highlighter looks best on fair to light skin tones because it just reflects beautifully on the skin. If you are dark remember to stay away from anything that's light because it can look ashy on your skin tone and that's one thing you want to avoid.

Price $38.00 USD
http://www.beccacosmetics.com/us/store/perfectors/perfectors/shimmering-skin-perfector-pressed/

7. MAC Extra Dimension Skin Finish in Double Definition

I had to throw in a limited edition highlighter that I absolutely love. Don't you just hate it when MAC released limited edition items that you fall in love with? It's even more painful when you start hitting pan. I love all of MAC's Extra Dimension products. The pigmentation is amazing! Double Definition is a bronzy gold highlighter. I only wear this when I have a bit of a tan but I definitely love to use it on my dark skin toned clients. You can still get something similar at the MAC store. I believe Gold Deposit will be a good dupe.

(Limited Edition. Not sold anymore)

I hope you enjoyed this blog and if you're looking for a good highlighter, I also hope this blog gave you some ideas on what to purchase next.


Tuesday, April 1, 2014

Smoky Prom Makeup

I'm so sorry i've been away for a while. It's been a hectic month. I work 6-7 days a week and barely have time to throw my feet up and relax. So for the past couple months i've been ordering my video recording equipment. I finally had some time to put together a youtube video. I filmed this tutorial on my little sister who is a senior in high school. I felt like this tutorial fit better on her since she will be attending prom in just a couple of months. My sister is a big fan of a smoky eye & some glitter so i came up with this. I hope you enjoy this tutorial. There will be more coming your way when time permits. Thank you all for the love & support AND patience. It's been a long time coming. Don't forget to like & subscribe!!!


Friday, March 14, 2014

Bronzed Eyes & Colored Liner

Wearing neutral shades can get boring sometimes but then again, wearing colored eyeshadows can be risky. If you don't know how to pair your colored eyeshadows, then it's safer to stick to the neutrals. Though there are hundreds of brown shades of eyeshadow, sometimes they can all look the same. I know I have over 50 brown eyeshadows and I always stick to using the same ones. Well guess what? There is an easy and fun way to play with color without worrying if it's too much or if it's going to make you look like you have bruised eyes. Try switching out the same old black eyeliner for a bold and fun colored eyeliner.

Any colored liner will work when you're wearing neutral shades. I love pairing my brown toned shades with a pop of bronze or gold on the eyelids. Throwing on a colored liner makes the eyes pop. Now if you really want to use a colored liner that compliments your eyes, try using a color that is opposite on the color wheel. For example: if your eyes are green, the color opposite on the color wheel is purple. Purple compliments green eyes very well so I would throw on a gold eyeshadow on the lid and a purple colored liner. That will not only make your eyeshadow pop, but your eyes as well. Give it a try.

This is an example of how to pair your neutral shades with a pop of color.


1. ALWAYS start off with priming your eyes. My go to eyeshadow primer is MAC painterly paint pot. You can apply this with a concealer brush or your finger.

2. On my crease I started with MAC's Soft Brown eyeshadow followed by MAC's Brown Script. I used a 224 blending brush by MAC to blend out these eyeshadows.

3. On the outer lid and crease I used MAC's Folie eyeshadow and blended it out using MAC's 217 blending brush.

4. For the lid I used a pigment by Alexa Persico Cosmetics in the color Bronze Baby. To keep it from falling out, I first primed my lid with Too Faced Cosmetic's Glitter Glue. For the application of the pigment I used MAC's 242 brush.

5. Now for the fun part...I used an RC Cosmetics eyeliner brush and a gel liner by Alexa Persico Cosmetics in the color Purple Ink. I LOVE, LOVE, LOVE this gel liner. Right away it transformed my entire look. On my lower lash line I used the NYX Comsetics wonder pencil in light.

6. The lashes I used for this look are from Le Petit Lapin Lashes in the style Luna. They are so soft, beautiful and light weight.

This is one of my favorite looks that I've created this year. Many people wouldn't think of pairing a colored liner with their eyeshadow but it really looks beautiful. If you don't have any colored eyeliners, don't worry. You can DIY at home by using any colored eyeshadow and mixing it with MAC's fix + or even eye drops.

Wednesday, March 12, 2014

Skin Care Tips & My Skin Care Routine

Before I share my skin care tips and daily skin care routine, let me say that I held back on posting on this subject until I noticed results in my skin. I've never had bad skin but I've had problems with break outs here and there. My biggest problem were comedones. I would get them all over my cheeks and chin. For those of you who don't know what comedones are, it's a more technical word for black/white heads. This made me insecure about my skin and covering it up with makeup made it even worse. Though I'm only 25, I'm always worried about wrinkles, sun spots, dark circles and everything else that comes along with aging.

Keep in mind that the way you eat has a lot to do with the appearance of your skin. Smoking & too much alcohol can contribute to poor skin health. I don't have a problem with that since I don't smoke or drink. One thing that has been a challenge for me is giving up caffeine. I've read that caffeine can also contribute to the development of acne. Since I'm a big coffee drinker, I'm not willing to give that up so I had to compromise with myself and give up soda. I've also changed my diet and the way I eat. I'm eating more vitamins and a lot of green foods and drinking plenty of water. Since then, I can say my skin health has improved beyond my expectations.

I wear makeup almost every day especially since I work in a professional environment. It's rare that I have a day off to let my skin breathe. Before I go to bed at night, I remove all of my makeup with a Neutrogena makeup remover wipe. For the past month I've been using the Vitagoods Spin for Perfect Skin brush along with some new cleansers I purchased. I can't tell you if it's the brush I use, the cleansers I've been using, or a combination of both that have contributed to my healthy skin because I use them together. The first cleanser/exfoliator I began using is the Paul Thomas Roth beta hydroxy acid 2% wash. I heard mixed reviews on this exfoliator, both good and bad. I have oily skin and this product may work differently on everyone. I did not find that this product dried me out like most people said it would. After the first use it left my skin feeling very soft and fresh. After 2 weeks of using this product, I did not see a significant difference in my skin so I wanted to try something else. I purchased the Cetaphil gentle skin cleanser and daily moisturizing lotion. I've heard so many good reviews on Cetaphil so I wanted to try it out. I've been using it for a week now and it's made a significant difference in my skin. For my morning skin care routine I use the cleanser and moisturizer.

Twice a week a use a peel off mask that I've been loving. I mentioned this product in my January Favorites blog post. It is the Boscia luminizing black mask. This mask is awesome because it's so easy to use. After I wash my face I apply it and leave it on for 20 minutes while I watch TV or while I'm on the computer. Once it's dry I peel it off. It's cool and kind of gross at the same time, because you can see the mask pulling out dead skin, impurities and excess oil. Over time and with constant use this mask will help the skin feel less oily, brighter and softer.

I am also working on scheduling regular facials to help with the up keep of my skin.

If you want to purchase the Vitagoods brush at a discounted price go to www.vanityplanet.com and use code m2spin at checkout for 70% off plus free shipping.

*I recommend everyone does their research on every product before purchasing. Every product has its pros and cons and will work differently on everyone. There are reviews all over the internet for all kinds of skin care products.

Friday, March 7, 2014

Pretty in Pink Eyeshadow Look

Before I get into the details on this look I want to give you some makeup tips.
I always get asked...
  • "How do you get your eyeshadow to look so vibrant?"
    • I wet all my lid eyeshadows (except matte eyeshadows) with MAC's Fix + to make them appear more opaque and vibrant. Depending on the eyeshadow, I pat on a few layers on to make the eyeshadow pop. The brush I always use on my lid is MAC's 242 brush.
  • "How do you get a clean sharp edge along the outer v/crease?"
    • I either use a MAC wipe to clean up the eyeshadow fall out and as I'm doing that, I drag the wipe up towards the brow (at an angle). That will give you a clean precise finish. The second option is to use Shadow Shields. This will not only catch any fall out, but also give you a sharp edge along the outer crease. Check them out www.shadowshields.com
  • "What are you must have eyeshadow brushes?"
    • Read my blog on my favorite eyeshadow brushes :-)
Now onto this look i did. Pink eyeshadow can be tricky because if you're not careful it can be over kill on the eyes or it can make you look sick. I always like to warm up my crease with neutral shades to balance out the look.

Before you apply your eyeshadow make sure you apply a good eyeshadow primer. My go to primer is MAC Painterly Paint Pot. It is a pro longwear base and it helps my eyeshadow last for 10+ hours. A lot of people have asked me if this is good for oily lids. I honestly haven't had a problem with it or on myself or on my clients but it's going to work differently on everyone. You can always go to the MAC counter and ask for a sample so you can try it out before you purchase it.

1. Start by taking a fluffy blending brush (MAC 224) and the color Soft Brown by MAC. This is going to be your transition color. Again, make sure you blend, blend, blend. That is the key to a flawless look.

2. If Soft Brown is dark enough for you, then skip this next step. I love warming up the crease with deeper neutrals so taking Cocoa Bear from Makeup Geek and the same blending brush (MAC 224), buff that into the crease. Remember not to take it too far up.

3. To add some definition to the crease take Damson by MAC (Pro Color) and place it in the deepest part of your crease using a smaller fluffy blending brush (MAC 217).

4. Now for my favorite part of this look. I LOVE MAC pressed pigments. I own almost every shade and they are the best. A lot of people use their finger to apply these but I like to take my flat shader brush (MAC 242), spray it with some MAC Fix + and then dip it into the pressed pigment. The pressed pigment used for this look is called Rock Candy. I don't know if they still have it in stores or online but I believe MAC has a lighter pink shade that will also work. You want to make sure you pat this color on. I always add 2-3 layers of the pressed pigments just to make the color really opaque. I use the first layer wet and the other 2 dry.

5. I love wearing a thick liner especially when I have a lot of color going on. I feel like it helps tone down the look a bit. For this look and all my other looks I use my favorite liner at the moment, MAC Blacktrack Fludiline. I apply this with my RC Cosmetics liner brush. For the bottom waterline I used MAC smolder and smudged it out with a 217 brush and Cocoa Bear eyeshadow.

6. The lashes used here are by House of Lashes in the style Noir Fairy (black). www.houseoflashes.com

On the lips I'm wearing a lipliner by MAC and I apologize for not being able to provide the name. I've had it for a while and the name rubbed off. I don't know if MAC still carries it. For my lipstick I'm wearing a pink lipstick that was hand made for me by www.five11fashion.com. You can find it on their website under the shade "Pretty in Pink" for $12.00 (USD). All their lipsticks are hand made so make sure to check them out.

Hope you try this look out and if you do, let me know if my tips helped.

Monday, March 3, 2014

February Favorites

Wow! Again, I can't believe how fast another month has gone by. Time for my monthly favorites. I love posting monthly favorites because it's not just about makeup. I get to throw in my favorite beauty products.

First monthly favorite is...

The Lorac Pro Palette
Lorac Pro Palette $49.00 (USD)
I love purchasing palettes because i feel like you get more for your money. I can create so many looks with all these eyeshadows. The thing i love most about this palette is that it has 16 eyeshadows; 8 matte and 8 shimmer. Every palette should have a good amount of matte shades and that's why I love this one so much. Keep in mind that these eyeshadows can be worn wet or dry. I blogged about using wet eyeshadows earlier this month. Every bride that has scheduled a bridal trial with me has shown me a picture of previous looks I've done using this palette. I highly recommend this palette to be in your makeup kit especially if you're a freelance makeup artist. You can create anything from bridal looks to sultry evening eye looks.  www.loraccosmetics.com


Shadow Shields $9.99 (USD)
To get into my next monthly favorite I just want to mention that I don't use tape to create my sharp clean edges nor do I recommend it. All I do when I finish doing my eyeshadow is take a clean MAC wipe and clean up any fall out dragging it up towards my brows. I did get some Shadow Shields this past month which I loved and became a monthly favorite. Shadow Shields are exactly what the name states. They're adhesive shields that you place under your eyes when doing your eyeshadow and they catch all the fall out. These are great when working with glitter and pigments but I use them even when I'm only using eyeshadow. These are versatile because they can be used to create that sharp clean edge or as a guide to create a winged liner. You can even use them to get a clean lipstick application.  You can purchase them at www.shadowshields.com or at the nearest retailer. They have a list of retailers on their website.
Too Faced Cosmetics Blush $30.00 (USD)

Last month I entered a contest on Instagram that Too Faced Cosmetics and @vegas_nay were having and I ended up winning. I won the entire Too Faced Spring Collection and though I loved everything I received, I especially loved their Peach Beach blush. I am more of a neutral blush vs. a pink or coral blush wearer so this blush just won me over. The packaging is also gorgeous!!! 


Vitagoods Spin for Perfect Skin
As much as I love makeup I also love taking care of my skin. I have been into a lot of skin care products lately. I don't have perfect skin but I always do my best to improve what I have. I received a spin brush from www.vanityplanet.com called Spin for Perfect Skin. What I love about this brush is that it's not just for your face but also for your body. It comes with 4 detachable brush heads; 2 for face, 1 for body & 1 for your elbows and knees. The brush is waterproof so you can use it in the shower. The brush is supposed to minimize the appearance of pores, remove bacteria, capture dirt, oil and excess sebum. I've only used it for my face along with a cleanser and so far I've seen improvement on my skin. The retail price of the brush is $99.00 (USD) but you can purchase one for only $30.00 (USD) plus free shipping for the United States when you use coupon code m2spin at checkout. 
Agave Healing Vapor Iron $149.00 (USD)

Lastly, I leave you with a good hair product. I don't have the healthiest hair in the world. I began dying my hair at age 17 and until this day I'm constantly changing my hair color. The bleach and hair dye has damaged my hair a lot and even when I let my hair grow out I go and dye it again. Another thing about me is that I'm not the type of person who can go without washing my hair. I have to wash my hair everyday. The feeling of just waking up and going to work without my hair being washed is so uncomfortable. Since I put heat on my hair almost everyday I was glad to see that Agave came out with a healing vapor iron. I know that there are other brands out there that have put something on the market similar to this one but this was the first time I had heard of it. If I'm going to put heat on my hair, I might as well use something that is going to be less damaging. I was very impressed with the results after the first use. My hair felt soft, healthy and looked so shiny. Lately I've been giving my hair a rest from the heat so I'll throw it up in a bun, but when I do style my hair I use my Agave Healing Vapor Iron. You can purchase one at www.sephora.com for $149 (USD).
 

Thursday, February 20, 2014

DIY Prom Makeup

Not only do I hear wedding bells ringing but the excitement of senior high school girls getting ready for prom too. Prom is a memorable event for every girl not only because it's the biggest dance of you high school years but the last dance before graduation and life as an adult. I know this year is going to be memorable for me because my little sister is also graduating this year and will be attending prom. She is filled with excitement but it's not because I'm doing her makeup lol. I'm sure she's excited about finishing high school.

When I think of prom I think of glitter, pink, big lashes and just an explosion of fun. I don't know if I'm the only one who has that idea but the last year I went to prom was in 2006 so please excuse me if that's not today's trend lol. I posted this look on my Instagram page a couple days ago and from the feedback I got I convinced myself that I was pretty spot on.

I know prom can get expensive with the dress shopping, the manicure & pedicure, hair up-do, shoes and lets not forget the makeup. So for those of you lovely ladies who want to do this yourself, here are the steps:

1. Prime your eyes with a good primer. I, of course recommend MAC's Painterly Paint Pot especially if you're going to be dancing and possibly busting a sweat lol. MAC's Painterly Paint Pot is pro longwear so it will last you longer than most eyeshadow primers.

2. I ALWAYS, ALWAYS, ALWAYS like to use a neutral transition color even when working with color. I took some Salted Caramel from the Too Faced Chocolate Bar Palette, but if you don't have this then you can use Soft Brown by MAC. I used my MAC 224 brush for this step.

3. Now to add a pop of color on the crease take Makeup Geek's Wisteria to blend this into the crease. If you like the softness of the eyeshadow Wisteria, then you can skip this next step. I love adding a darker crease color for definition so I took Sugar Pill's Poison Plum eyeshadow and blended it using MAC's 217 brush. Poison Plum is a very rich bright purple and will definitely make that crease pop. Make sure to blend.

4. To further define the crease take an angled brush (MAC 266 or 263) and Makeup Geek's Corrupt eyeshadow and draw a line in between your lid and crease. You can also create that line a little higher up if you want the illusion of a bigger lid. Go back in with MAC's 217 and blend that line into the purple eyeshadows from step 3.

5. Next is the messy but fun part. I always like wearing Shadow Shields when applying my eyeshadow. That's how I achieve the crisp eyeshadow line. Shadow Shields are also great when working with pigments or glitter since they tend to have a lot of fall out. Take a flat shader brush (MAC 242) and Makeup Geek's Prom Night eyeshadow and apply it all over the lid. I used this eyeshadow wet to get a more opaque and metallic effect. You can reference to my post on how to use your eyeshadows wet. Once that dries, take Too Faced glitter glue with that same 242 brush and apply it all over the lid. You want to make sure you cover your eyelid entirely so that the glitter can adhere to the entire lid. Before your glitter glue dries, take Makeup Forever's glitter in #13 with that same brush and pat it all over the lid. Make sure to create a sharp clean line right below that cut crease line from step 4. You want a very clean and defined crease.

6. Take your favorite eyeliner and create a cat winged liner for a more dramatic effect. I do recommend using liquid liner because it's easier to cover the granulated texture of the glitter but since I prefer gel liner, I used MAC's Blacktrack Fludiline. Don't forget to line your bottom waterline and smudge some of that Wisteria eyeshadow to blend out the liner.

7. My lashes are from House of Lashes in the style Noir Fairy. I love these lashes!!! The lash band is thicker than most lashes so that's why you want to create a thicker liner. It will help blend the lash band into the liner.

Hope this post will help those of you lovely ladies do your own prom makeup or if you're an aspiring makeup artist and have clients for prom, try this out!!!

Monday, February 17, 2014

Eyes that Sparkle

I didn't want to give this look a category because I think it's so universal and can be worn for several different occasions. This look has the perfect combination of neutrals but with a nice bright lid that glistens in the light. This look really helps open up and awaken the eyes. I think this look is great for a wedding, a night out, a formal event or even for day time wear.

1. Like always, start with a primed lid. The only primer I use is MAC's Painterly Paint Pot. If your skin tone is darker than mine you can use Quite Natural Paint Pot. I'm very fair in complexion so this color blends in nicely. Normally I apply this product with my fingers and then I got back in with MAC's 217 brush to buff it out.

2. I always start with my transition color because it's easier to build from it. Take MAC's 224 blending brush and MAC's Soft Brown and really buff that color into the crease. Keep blending until you see no harsh lines. The eyeshadow needs to look blended so you can't see where it starts and where it ends. Blend away!!!

3. Let's build that intensity! Take MAC's Brun eyeshadow with a smaller blending brush. For this step I used MAC's 217. I like to use smaller blending brushes when working with darker eyeshadows. Place this color on the outer v of the eye and blend it into the outer 1/3 of the lid. To define the crease even further, I took an angled brush by MAC and with that same Brun eyeshadow I created a cut crease line. I went back in with MAC's 217 brush and blended out that line diffusing it into the Soft Brown eyeshadow.

4. Moving onto the lid. The color on my lids is a pressed pigment by MAC and I believe it was limited edition. The one I used is called Vanilla Diamond but if you don't have it you can use Blonde Streak also by MAC. If you don't like pressed pigments and want to use something else, feel free to use any bright eyeshadow you have. I suggest either Nylon by MAC or Shroom also by MAC. If you are going to use the pressed pigment my recommendation is to always use them wet. They just adhere better to the eyes since they do have fall out. You can always go back and a dry layer just to add more of the glitter that the pressed pigments have. My go to brush for this step is MAC's 242.

5. I love a little bit of drama on the eyes so I did go back in with a tiny bit of Carbon. I just took a small pencil brush (MAC 219) and placed it in the outer v of the eyes and then I just blended it out using MAC's 217 brush.

6. My favorite go to liner is Blacktrack Fluidline by MAC but I am in the process of trying out a new one that I'm hoping to get my hands on soon. I used an RC Cosmetics eyeliner brush for this step.

7. The lashes in this look are by Elegant Lashes in the style 747M. You can of course choose your favorite brand and style according to your eye shape.

I thank each one of you in advance for taking the time to read my blog posts. I know it's not as easy as to see it visually but hopefully I can get my youtube channel up sometime this year.
Again, you can always substitute all the products I used. You don't have to go out and purchase everything mentioned in the steps.

Monday, February 10, 2014

How To Use Your Eyeshadows Wet

I'm going to share a makeup tip with you. Some of you may already know this trick but I know many of you still don't, based on the comments I constantly get on instagram. If you follow me on instagram you'll notice how creamy and pigmented the eyeshadows look on my eyelids. So how do I get my eyeshadows to look like that? I apply my eyeshadows wet. Yes, wet! Did you know you many eyeshadows are made to be applied either wet or dry? It's true. To wet my eyeshadows I spray my brush with MAC's Fix + before dipping it into the eyeshadow or I sometimes spray my eyeshadow directly with the Fix +. I love using this technique because it also allows me to create a "cut crease" look without really cutting the crease. When you wet your eyeshadows they turn into a creamy paste and this gives you more control of where you want the placement of the eyeshadow. I don't wet any of my matte eyeshadows. This is only for those shimmery eyeshadows and only for the ones I use on my eyelids. This technique also helps with those eyeshadows that have a lot of fall out and the ones that have poor pigmentation. I use all my eyelid eyeshadows wet even those that are rich in pigment.

I swatched some eyeshadows for you both dry & wet so you can compare the difference.

Swatches from the Lorac Pro Palette
I don't know how well my camera captured the swatches but you can see a slight difference in opacity, pigmentation, and texture. Try it out at home and let me know your thoughts. All these eyeshadows were directly swatched on the skin without any eyeshadow primer.
Swatches from Makeup Geek Eyeshadows

Black Smoky Eye

Is it just me or does everyone just love a sultry smoky eye? I probably don't wear smoky eyes as much as I would like to because I love sticking to my warm tones. Once in a while I'll throw in a bright eye. This is your traditional smoky eye with a little twist. I added a beautiful pressed pigment to give the eyelids a foiled look.

This look tends to get messy especially when working with black eyeshadow. I always do my eyeshadow first and then my foundation. You can also use some Shadow Shields. They work great at catching any fall out.


First and foremost I always start with my brows. I will post a brow pictorial soon. I've mentioned this a lot but my absolute go to brow products are by Anastasia Beverly Hills.

1. Prime your eyes using your favorite primer. My go to as I've also mentioned before is Painterly Paint Pot by MAC. It is a pro longwear paint pot so it helps make the eyeshadow last longer.

2. Start with the crease. Take your favorite fluffy blending brush. I used MAC's 224 and applied Soft Brown (MAC) to the crease. This is really going to warm up the crease and help create that nice transition to the darker eyeshadows you will be using.

4. We are going to add more depth to the crease. Take a smaller blending brush (MAC 217) and the color Embark (MAC) and place that color in the deepest part of the crease. Focus the color right above the lid and try not to blend too far up.

5. If you wish to add a highlight to your brow bone, take some Vanilla eyeshadow (MAC) with a flat shader brush (MAC 242). Once you place your highlight feel free to go back in and blend everything out with MAC's 224 or any other fluffy blending brush.

6. This step is the most important as it will transform this look into the smoky eye. To really get a black smoky eye you need a good pigmented black eyeshadow. My top recommendation for this is Makeup Geek's Corrupt eyeshadow. You want to pat the eyeshadow with a flat brush. My go to brush for this step is MAC's 242 but you can use anything similar. I take a fluffy blending brush (MAC 217) and I blend some of that product up towards my crease just to create a nice transition. Once everything looks nicely blended I take MAC's pressed pigment in the color Jet Couture. I love this pressed pigment. If you want a matte black lid then skip this step. I love using my pressed pigments wet to really get that opaque pigmentation. I take the same MAC 242 brush and spray it with MAC's Fix + setting spray. Once the brush is damp I dip it into the pressed pigment. Again, patting motions work best when applying your eyeshadow onto the lid. Using the pressed pigment wet gives it a more foiled look but if you more of a glittery look I suggest you use it dry.

7. I love wearing eyeliner on every one of my looks but you can also wear this look without eyeliner. I always use MAC's Blacktrack Fluidline. I prefer flat black eyeliners. The brush I used for this is from RC Cosmetics. It doesn't have a name but it is an eyeliner brush.

8. Lashes are from Lepetit Lapin Lashes in the style Babette. I love these lashes! They are the perfect size and density and not to mention they are mink lashes.

Friday, February 7, 2014

DIY Bridal Makeup

I hear lots of wedding bells! Spring is such a popular wedding season and I've had so many requests to create another bridal look. For those of you who are daring to do your own wedding makeup, here's a DIY bridal look. I'm a makeup artist but I'm not even sure I want to do my own makeup for my wedding. I want to be stress free and just relax and feel pampered. I know that weddings are costly and many brides are trying to cut down on costs by doing certain things themselves. Bridal makeup can be very expensive and so I understand those of you who want to save yourselves those extra Benjamin bills.

Now feel free to make this look your own. You don't have to follow all these steps. You can customize it to make it more natural or you can even smoke it out even further.

For this look I used shadows from the Lorac Pro Palette that I just got in the mail. I will be doing a review on this palette soon.

For more bridal ideas visit me on instagram @muastephnicole


1. Start by priming your eyes using MAC's Painterly Paint Pot or you can use the eyeshadow primer that comes with your Lorac Pro Palette. I've been using this product with my finger to warm up the product and apply it evenly all over my eyes.

2. You all know I love starting with my crease. Take MAC's 224 or any similar blending brush and blend the color Mauve into your crease. The key to a flawless application is to blend.

3. Let's deepen up the crease by taking a smaller blending brush MAC 217 and the color Sable. I'm going to focus this color just in the deepest part of my crease. This next step is optional but if you want an even darker and defined crease take the color Espresso and place it on the outer v and drag it into your inner crease. You can use a more defined brush for this. I normally use MACs 219 brush and I go back in with MAC's 217 to blend everything out.

4. Let's start by brightening up the eyes. Take the color nude and spray it with some MAC fix +. I love using my lid colors wet because I feel like they adhere to the eyelids better and appear more vibrant. Next taking a flat brush or MAC 242 take the color Lt. Bronze. I used it damp and placed it all over the lid. To add more lightness to the lid I applied the color Champagne in the center of the lid.

5. This step is also optional but I added a tiny bit of Black to the outer corner of the eye. You may have noticed that my style has transitioned into a very defined look with a clean sharp edge.

6. You can also exclude the eyeliner if you want more of a soft look but I LOVE thick black matte eyeliner. I used MAC's Blacktrack Fluidline. I would recommend a waterproof liquid liner for a bridal look but most liquid liners are shiny which looks cheap in my opinion. If anyone knows of a good matte waterproof liquid liner comment below. For your lower lash line I recommend using a more natural liner to line the waterline. You cant really tell in the pictures but I used a white eyeliner to open up my eyes and I took some Pewter eyeshadow to smudge it out on the lower lash line.

7. For lashes I used Lepetit Lapin Lashes in the style Babette. These are mink lashes which I love because they look natural and the density is perfect. I would prefer a more natural lash for a bride but not too natural where it's not noticeable. You can use some waterproof mascara to apply to your top and bottom lashes to finish off the look.

Now I didn't post a full face and I apologize. I've been exfoliating my face and unfortunately the first few days have been the worst because I broke out which is normal but you can really play up the look with a fun lipstick and warm blush. This eye makeup is neutral so you can pair it with almost anything. Leave your thoughts and comments below.

Monday, February 3, 2014

Camera & Editing Apps for My Pictures

This has been the most asked question "What kind of Camera do you use to take your pictures?" or "What apps do you use to edit your pictures?" Well everyone, I finally decided to list all the details here. I get asked these questions so much and I gave up on answering everyone.

Let's get started with the camera. At first I was using my iphone 5 but I hated that it wouldn't capture the details or true color of my looks. I had this camera in my house for a couple years and never paid any attention to it until I finally got frustrated with my iphone 5 camera. I know that other artists
Canon Rebel T1i
capture great pictures with their iphone and great lighting but let me just say that there is no good lighting anywhere in my house. So I finally decided to try out the camera which is the Canon Rebel t1i which is an older model but I think the pictures look amazing. I take the pictures in my room which has horrible lighting but the flash helps out. I also have the settings on close up mode to help capture the details better. I'm going to invest in a diva ring light to make my pictures look even better.

On to the editing apps. Yes, I edit my pictures. I have no shame in admitting that. I like to soften my looks because I'm human and I have pores and imperfections that take away from the looks I create. I also have bad lighting and even with the camera flash sometimes the colors get washed out and the pictures don't reflect what the makeup looks like in person. Using the app morebeaute2 I soften and warm up my pictures.

Picstitch app

To put my pictures in a collage I use the picstitch app. There are several layouts you can use but I recommend upgrading to the pro version. The pro version has more layouts and also allows you to change the borders.


A+Signature App
And lastly, the app for my watermark. I don't want to disappoint you but this signature is custom made. I made it myself using the A+Signature app. This app does have fonts you can use but it also gives you the flexibility of creating your own signature. It is a little difficult because it's a free hand signature on a screen. It probably took me about 4 tries before I got it just how I wanted it.

Hope this helps :-)


Friday, January 31, 2014

January Favorites

This month has gone by so fast. I can't believe the first month of the year is gone. I will be sharing my favorite products for the month of January.

Chocolate Bar Palette $49.00 USD
To start off, for those who follow my instagram page @muastephnicole, you may have noticed how often I use my Too Faced Chocolate Bar Palette. I got this for Christmas and started using it this month. What do I love about it? For starters this is a warm and neutral palette. It has 16 eyeshadows both matte and shimmer ones. I love how creamy and pigmented these eyeshadows are. They're so easy to blend and the combinations are endless. You can create anything from a natural to a dramatic look. My favorite thing about this palette is how delicious it smells. I can't seem to put it down. Go get yours today! Promise you'll love it as much as I do.
Makeup Forever Glitter $15.00 USD

If you love glitter you'll love Makeup Forever's Glitters. I picked 2 up on new year's day and I love creating looks with them. I love the fact that they're not chunky glitters. I hate glitters that are too chunky because I feel they're a little more difficult to work with. Makeup Forever's glitters are very fine and the ones the I have been using are #12 & #13. #12 is a multi colored pink and #13 is a multi colored silver. They're very easy to apply. I used Too Faced Glitter Glue to apply my glitter. Check out my instagram to see the looks I've created with these products.

Inglot Pure Pigment $14.00 USD
Have you ever walked by a makeup counter and not noticed any of the makeup products? I have. It so happened that on the day I was at IMATS I stopped by the Inglot booth and started looking at all the pigments, glitters, eyeshadows...EVERYTHING! I was pretty upset at myself for not purchasing these products sooner. After all, I do have a pro card with them. I was in Vegas for the new year and I must have passed this store like 3 times. I knew it was calling my name. I can't narrow down my one favorite product because I just love everything I got. With that said, make sure you check out their pigments and body sparkles. They're AMAZING!!!


Boscia Luminizing Black Mask $34.00 USD
Now to a skin care product. I think all of my January favorites were discovered on a shopping trip in Vegas. I walked into the Sephora store and picked up a few things while my friend was looking at some skin care products. We wanted to save ourselves $150 on a facial so she found this luminizing black mask by Boscia. We tried it and fell in love. According to the Sephora website, this mask detoxifies, purifies and brightens. It has deep cleansing properties that draw out dirt and oil. I love this mask because it peels right off when it's dry. I normally use it 2 times a week. I wash my face first and then I apply this mask. Make sure your face is dry before applying. Wait about 15-25 min before peeling it off. It works best if you apply a thicker layer because it's easier to peel off when it dries.

Dior Addict Lip Glow $32.00 USD
On to my last January favorite. I also got this product right after Christmas and use it almost every day. This is the Dior Addict Lip Glow. This is a lip balm that enhances your natural lip color while it moisturizes and protects the skin. I have those days where I feel like wearing a very natural dewy and fresh look and I love throwing on this lip balm. This lip balm will look different on everyone as the color reacts directly with the unique chemistry of the lips. It looks pink on me since my lips are naturally a light shade of pink. It looks very natural. It is a little on the expensive side so I recommend you try it on before you purchase it just to make sure you like it.

Sunday, January 26, 2014

Makeup Geek Eyeshadows Review & Swatches

Some of you have asked me to do a review on Makeup Geek Eyeshadows and to suggest some to start off with.

Let me start off by saying that I've been loyal to MAC since I started wearing makeup. This is the first brand I started wearing all thanks to my mom for getting me hooked. I was so close minded about trying other brands. When I started watching youtube videos, makeupgeektv was the first makeup channel I started watching. Marlena inspired me so much and when I saw that she had launched her own makeup line I told myself I had to try her products.

I got around to placing my order and of course just like most people I wanted neutral colors so I ordered a lot of warm and neutral eyeshadows. My first impression was "Wow, these resemble MAC eyeshadows". I love the fact that you have the option of ordering them in the pan. They already come magnetized which is awesome because you can create your own custom palette.

The next thing I was impressed with was the pigmentation of the eyeshadows. Yes, they're very pigmented and so creamy in texture. I'm not joking when I say these eyeshadows are equally or even better than MAC's. Also, the price on the Makeup Geek eyeshadow pans are only $5.99 USD.

Now, since Makeup Geek products can only be purchased online at www.makeupgeek.com it's hard to pick what you want without being able to swatch anything. I will be recommending my favorite Makeup Geek eyeshadows and what I suggest for starters.

These are some of my favorite Makeup Geek Eyeshadows:
1. Cocoa Bear
2. Latte
3. Mocha
4. Pretentious
5. Frappe
6. Peach Smoothie

You may have seen me use most of these in some of my looks. Like I said, these are very pigmented and I have swatched them for you without any primer or eyeshadow base.

Just imagine how much more beautiful these look over an eyeshadow base. You can find more swatches of these eyeshadows on the Makeup Geek website at www.makeupgeek.com. I hope you found this blog useful. I promise you wont regret your Makeup Geek purchases.


My Favorite Eyeshadow Brushes & Brush Care

I get asked a lot what brushes I use to get flawless blending on my eyes. My favorite brushes and the one's I'm currently using are from MAC. Why MAC? Well I started off buying MAC makeup and those were the first brushes I was introduced to. With proper care these can last you a very long time. I know there are dupes out there which I will list but since I am a MAC pro member I get them for a good price.

First I want to talk about brush care. Taking care of your brushes is very essential. If you have good quality brushes they will last you a long time. Brushes carry a lot of bacteria especially after using them on your skin. I wash my brushes about once every 2 weeks. By washing I mean I shampoo them and let them air dry. It's natural for brushes to shed but washing them properly will help them shed less. I also have about 3 or 4 of the same brush style so I alternate them so that they don't wear out fast. You want to make sure that you don't submerge your brushes under water or let them float in a sink full of water. This can cause the glue of the brush to dissolve and it can ruin your brushes. I accidentally left one of my brushes wet and the handle started breaking apart. For in between use, I clean my brushes with MAC's brush cleanser. I spray my brush with the MAC cleanser and I gently wipe my brush on a soft tissue. You want to use clean brushes before every eyeshadow application. This will help the brush grab the true color of the eyeshadow. Don't use dirty brushes that have yesterday's eyeshadow. That can tend to give your eyeshadow application a muddy look.

So what brushes do I use on my eyes? I have a few favorites.


MAC 224 Blending Brush
MAC Brush 224- $32.00 USD
Dupe: Sigma E40- $14.00 USD

I use this brush on a daily basis. I apply my crease color with this and it blends nicely. This brush works for people who have a large crease area. I like to use my lightest shades with this brush since I use my lightest shades as my transition colors. Since this brush is fluffier than the other ones I use, it evenly blends the eyeshadows on my crease.


MAC 217 Blending Brush
MAC Brush 217- $24.00 USDDupe: Sigma E25- $12.00 USD
 
I love this brush. I also use it in my crease. Since this brush is more tapered than the MAC 224, I have more control of my eyeshadow placement. For this reason I like to pick up my darker crease eyeshadows and apply them with this brush. Brushes with white bristles tend to pick up the eyeshadow better. This brush is also great because you can go back in and blend out any harsh lines.

 MAC Brush 242- $25.00 USD
Dupe: Sigma E60- $14.00 USD

This is one of a few brushes that I like to use for my brow bone highlight and lid color. I like that it's very flat and the eyeshadows grab on pretty good. If I want the eyeshadow to look more pigmented or opaque I wet this brush with MAC's Fix + and then I dip it into my eyeshadow. This is the only brush i'll ever use to apply my glitter glue and glitter.

MAC Brush 219- $25.00 USD
Dupe: Sigma E30- $12.00 USD

This is what I call the pencil brush because it reminds me of a pencil's tip. So what is this brush good for? Well several things. I love using dark eyeshadows especially black with this brush. It picks up the right amount and places it directly where you want. It is a very precise brush and creates the shape that you want. I also like using this one to smudge out the lower lash line. It's a good brush for creating a smoky effect.

I use a variety of different brushes but I think the ones mentioned above are great for those of you who are starting and want to know what brushes are good to start with. I think the brushes make all the difference in makeup. You can use drug store makeup or department store makeup and they can both look equally just as good with the right brushes. This blog is not to persuade you to purchase MAC or Sigma brushes. I think you can purchase anything similar of good quality that will give you the same results.
 
Hope this blog was useful to some of you. Thank you for stopping by!!!

Sunday, January 5, 2014

Cocoa & Glitter- Too Faced Chocolate Bar Palette

Wow...what can I say? This palette is not just beautiful but it smells delicious! Just like cocoa. Well it should, it's made from natural cocoa powder. I have this habit of sniffing my palette all the time now. I get tempted to bite it but I know it's probably not a good idea.

I got this palette for Christmas and I've created a few looks with it already but I wanted to share this one with you because it is my favorite so far. I love purple and glitter!!! If you have a chance to pick this palette up I suggest you do. You get a total of 16 eyeshadows for only $49.00 (USD). Purchase it on www.toofaced.com or at www.sephora.com.

Follow these exact steps to get this look:

1. Start by taking the color Salted Caramel and a fluffy blending brush (MAC 224). Blend this color into the crease and make sure you keep blending until there are no harsh lines.

2. To deepen the crease, take Semi-Sweet and place it in the crease but don't take it too far up. We want that Salted Caramel to be our background color. For this step you can use MAC's 217 brush.

3. Let's highlight the brow bone. Take White Chocolate and pat it all over your brow bone. For a bit of shine, take just a bit of Champagne Truffle and place it only below the arch of your brow. You can go back in with Salted Caramel and blend it into the highlight color. Pop some of that Champagne Truffle on the tear ducts.

4. Now to darken up the outer lid and crease, take MAC's 217 blending brush and the color Triple Fudge. Don't take too much because this color is intense and too much of it will be hard to blend. Keep this color on the outer lid and crease and bring whatever product you have left over towards your inner crease.

5. Take a flat shader brush (MAC's 242) and spray it with some Fix + and dip it into Candied Violet. Pat it all over your lid. Once it dries, take Too Faced Glitter Glue (if you don't have this you can use any other adhesive or eyelash glue) and pat it on your lid. Quickly pick up the glitter. Here I used Makeup Forever's Glitter in #12. Pat it on the lid over the glue. Make sure the glue is not dry or the glitter will not stick too well.

6. Whenever I used glitter on my lids, I like to use a liquid liner to line my eyes with. The liquid liner covers up the grains of the glitter easier than any other form of liner. You can use a black eye kohl pencil to line the bottom lash line.

7. Apply your favorite lashes. Here I'm using House of Lashes in the style Pixie Luxe. Apply mascara to the top and bottom lashes.

8. On my lips I'm wearing Boldly Bare Lipliner with Yash Lipstick both by MAC.

I hope these steps were easy to follow. I will try to post pictorials for you so that it's easier to understand the steps. Don't forget to comment with any questions. Thank you.